| Author |
Message |
|
Mec
Firing on two.
Joined: March 6th, 2010, 12:58 am
Posts: 139
Location: Argentina

|
 Re: My old Blue Bamboo It looks great!
|
| April 3rd, 2010, 6:11 pm |

|
|
|
Old-Nail
Firing on two.
Joined: October 7th, 2009, 12:10 pm
Posts: 2192
Location: NWUK
|
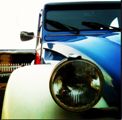
Re: My old Blue Bamboo Mec wrote: It looks great! Thanks man.  So it finally happened, a whole day without rain - and on a holiday weekend too! I was up first thing this morning in a bid to get those two back doors into paint before the clouds had chance to change their mind. As it happens the weather got better as the day progressed so I was able to put three good coats of paint over the tinted primer that I had put on previously.  Because of the general lack of room in my garage I opted to spray one door resting on my Mrs's long suffering pine chair, while the other one was suspended from the ceiling. Now both methods have their pro's and cons, but painting a door while it spins around in mid air with the force of the paint jet is not something I care to repeat. Being hung up sideways on while it dries means that there's less chance of any dust settling on the wet panel, but trying to spray a moving target certainly made life interesting for a while.  I painted two wet coats with a flash time of around twenty minutes or so in between, before putting on a final coat using premium high gloss thinners, which gave a pretty nice gloss straight from the gun.  I left the doors for a couple of hours to allow the paint to harden off some, before fitting the rubber door seal back on using waxoyl in the channel that it sits in. I also used plenty waxoyl in the hinge on the central body post, then slid the doors home. I'll fit the glass and door locks/handles tomorrow to finish the job. I have still to buff out the paint yet using Farecla G3 as I did with the rear wings, but I'll do that in a couple of weeks when hopefully the front doors will be on there too, and I'll be fitting new bright metal trim strips to them. 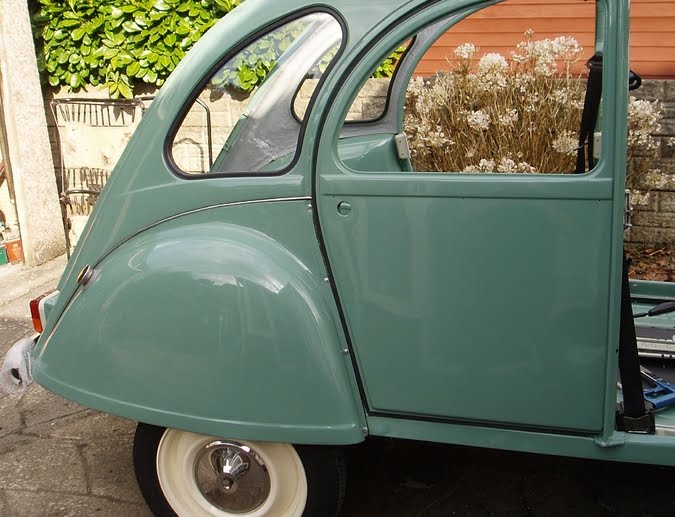 As I pushed the car back into the garage I saw how well the paint had gone on and so took the photo below, it just left me wondering was that the door painted on the chair or by the spinning technique! LOL. 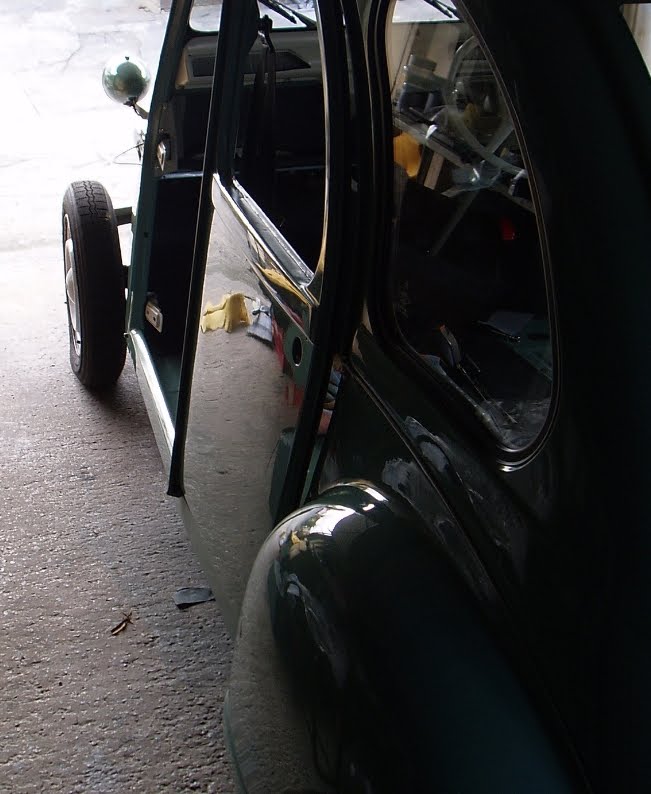
_________________

'Democracy my Arse'
|
| April 3rd, 2010, 7:28 pm |

|
|
|
Old-Nail
Firing on two.
Joined: October 7th, 2009, 12:10 pm
Posts: 2192
Location: NWUK
|
Re: My old Blue Bamboo More sanding and sore fingers. It has to be said that prepping a cars bodywork ready for paint is possibly one of the most time consuming things that you can do. Every stage has to be done right if you are to get decent results, and any short cuts taken now are bound to come and bite you in the ass at some stage in the future. 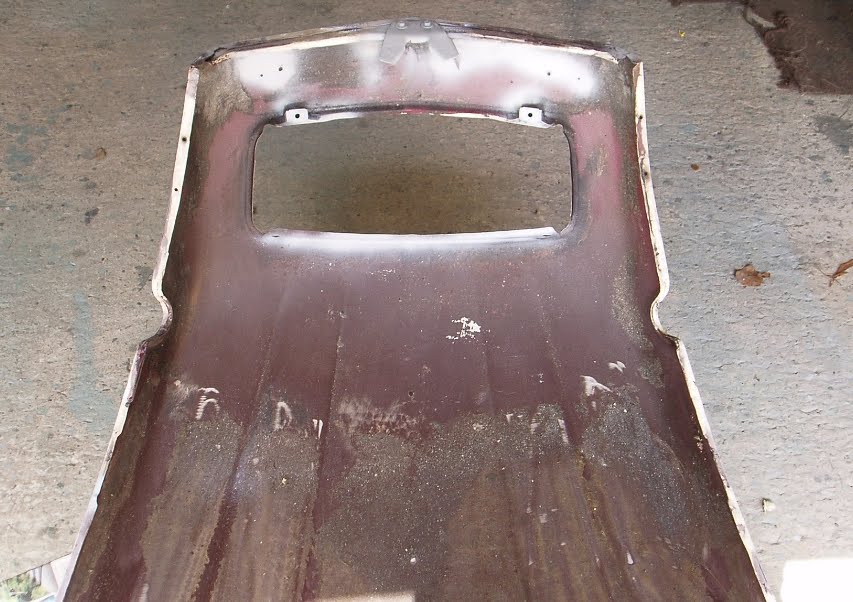 With this build I'm trying to strike a balance between getting results that will remain looking good for a few years, and yet I'm also concious that if I were to take all the time that I should take with this thing then I'm in danger of missing getting the car on the road in time for summer! The answer seems to be to get up earlier and work longer, and the consolation at the end of the day is the nice chilled pint (or two) of Caffreys Ale that I'm supping right now as I write this. My last post told how I'd managed to get the back doors painted, which leaves just the front doors, bonnet, and front wings still to do. I do tend to hop around a little from one job to the next and today has been no different. The picture above shows the underside of the bonnet stripped out ready for primer, but after applying some etch primer to the bare metal I decided that I'd put stone chip on the rust prone inner grille section, the rest will be painted in the normal way before the new sound proofing is added. 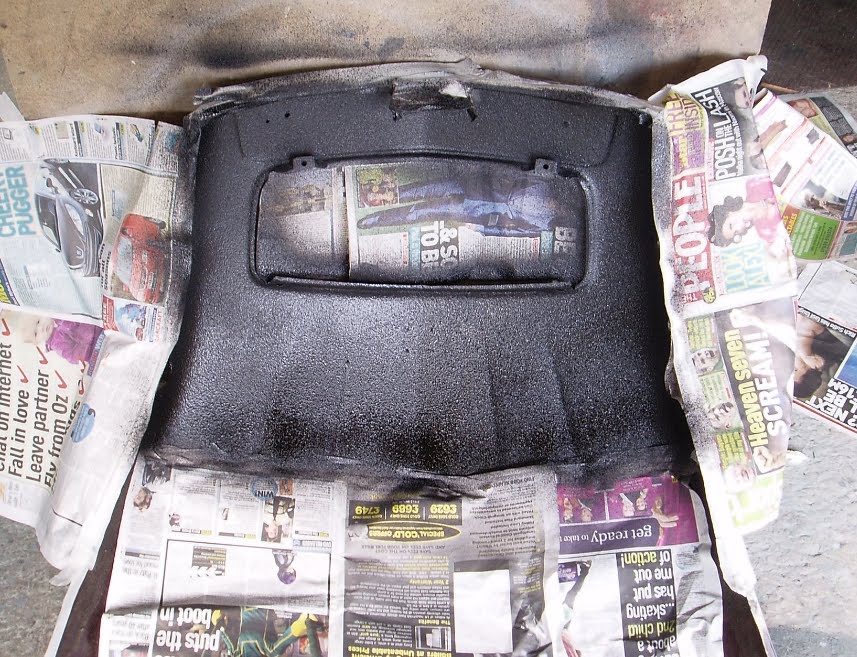 With that done I tuned my attention to the front doors. The pic below shows how they are after the fire that consumed the donor vehicle. Lots of burned paint and mess. I started out by washing them with soapy water, then let them dry in the sun for ten minutes before wiping them over with cellulose thinners. This should get rid of any wax polish that might have been on there before I started sanding the paint, as if I began sanding with wax still on there, or worse still silicone, then all that would happen is that the silicone would be embedded into the paint and the whole panel would need to be taken down to bare metal to get rid of it.  Now despite how ugly this paint looks, it is mature two pack which means it's very tough, and once the surface has been skimmed off it will make an excellent substrate for my new paint. Lots of sanding followed...lots... and all done by hand because it's too easy to get carried away and go too far when using a mechanical device. As the sun started to go down I was left with two doors that just need a little more detailed attention before the first coat of primer. The bubbly effect in the photo below is just soap suds by the way not bad paint. 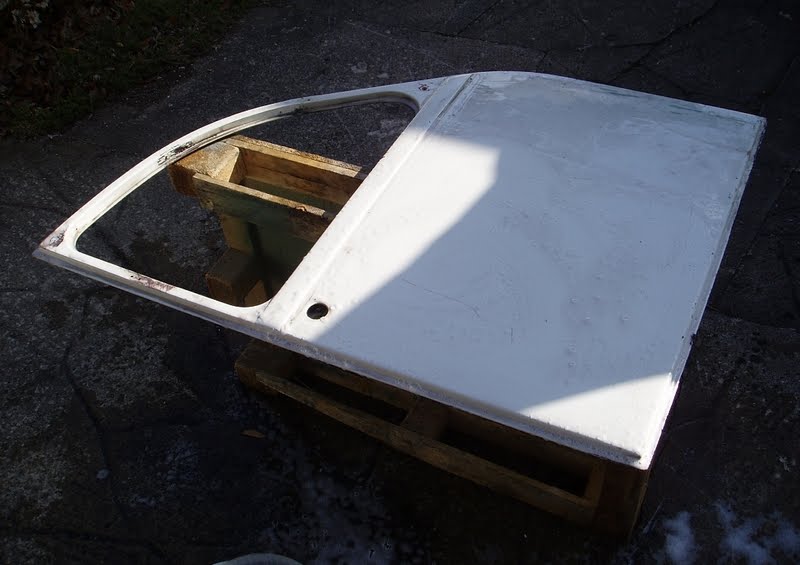 Something else that I did today, and another great tip, is to wipe the old rubbers from the rear doors with Cellulose thinners. Take a look at the condition of them in the photo below, they came from a car that had been brush painted blue remember, and there was blue enamel and all sorts of other stuff on them. I decided to buy new ones, then I saw the price of new ones and decided to restore these instead! LOL.  Cellulose thinners are a fantastic thing to have in the garage, used as a cleaning agent you'd be hard pressed to find better. Naturally you have to be aware of the nature of the item to which you apply them otherwise you could find yourself melting plastic or removing paint quite unintentionally, but used with care it's fantastic stuff, and very cheap. I took some fine grade steel wool dipped in thinners and gently rubbed the surface of the window rubbers. Away came the paint, greenmould, and any number of strange marks that they had accumilated over the years to reveal a set of 'as new' rubbers. A gallon tin of thinners can be had for a tenner, it's paid for itself already.  Finally for today I'd like to recommend a book. I started out with bugger all knowledge of anything garage related really. The respray work that I have been able to do so far has surprised me in that I wouldn't previously have thought I could do it, especially given that I don't have a background in anything like this type of thing. I learned what I could from reading, before trying out what I had read. The book below by an American fella called Pat Ganahl is probably the best book I have ever read on the subject of DIY respraying - it really is worth buying. It's written in easy to understand language, is packed full of tips and useful information, and reading it gave me the confidence to tackle a job not normally associated with absolute beginners. Anyone wanting to learn about painting cars - you need this book! 
_________________
'Democracy my Arse'
|
| April 4th, 2010, 9:59 pm |
|
|
|
Old-Nail
Firing on two.
Joined: October 7th, 2009, 12:10 pm
Posts: 2192
Location: NWUK
|
Re: My old Blue Bamboo  More fine weather has meant more progress. Unfortunately I don't have time to outline it all here today but please follow the link to read the full story. http://olsnails2cv.blogspot.com/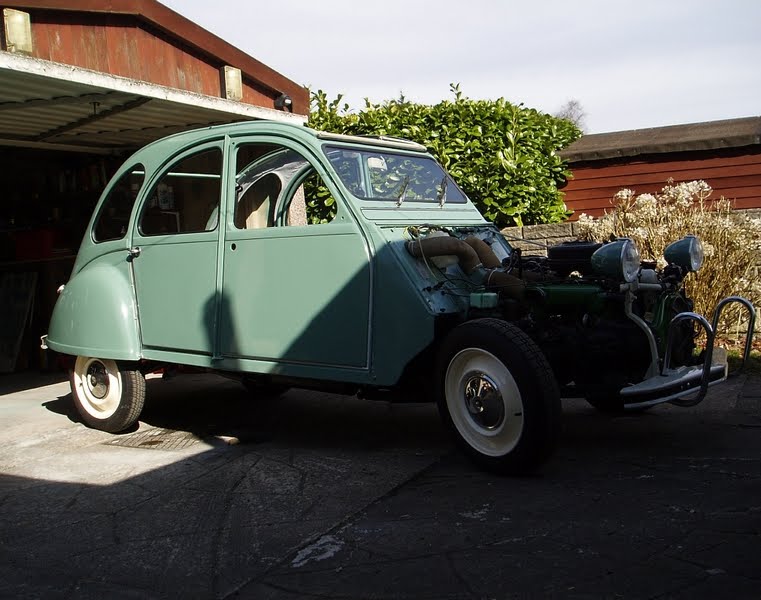
_________________
'Democracy my Arse'
|
| April 7th, 2010, 9:33 pm |
|
|
|
George
Spellin Bea
Joined: January 6th, 2009, 5:49 pm
Posts: 949
Location: Lincolnshire
|
Re: My old Blue Bamboo OOOOOOOOOH its so pretty. i check this thread everyday too see how far you progress, its like those magazines you buy each week and build a model car you just can wait too see how good it going to look  Spectacular work Old Nail 
_________________

|
| April 8th, 2010, 1:18 am |
|
|
|
Old-Nail
Firing on two.
Joined: October 7th, 2009, 12:10 pm
Posts: 2192
Location: NWUK
|
Re: My old Blue Bamboo Thank you George it's nice of you to say so. The weather men say dry and sunny for weekend so I'm hoping to get the bonnet painted and fitted with it's bling over the next few days. We'll see eh?
_________________
'Democracy my Arse'
|
| April 8th, 2010, 9:27 am |
|
|
|
Old-Nail
Firing on two.
Joined: October 7th, 2009, 12:10 pm
Posts: 2192
Location: NWUK
|
Re: My old Blue Bamboo Another spell of nice dry weather has seen me prep the bonnet fully in readiness for the top coat that I hope to apply tomorrow. For those of you that are interested in the process I use then here are a few pictures showing the different stages of work.  I started out (above) by wiping the panel with laquer thinners to remove any old contaminants such as tar, wax or silicone spray polish that might have been on there, this was followed by panel wipe. I then started sanding down the existing topcoat using a dry open coat paper. I do this dry so that I can see where I've been, if I used wet and dry here then the water would confuse matters, making everything look too shiny. 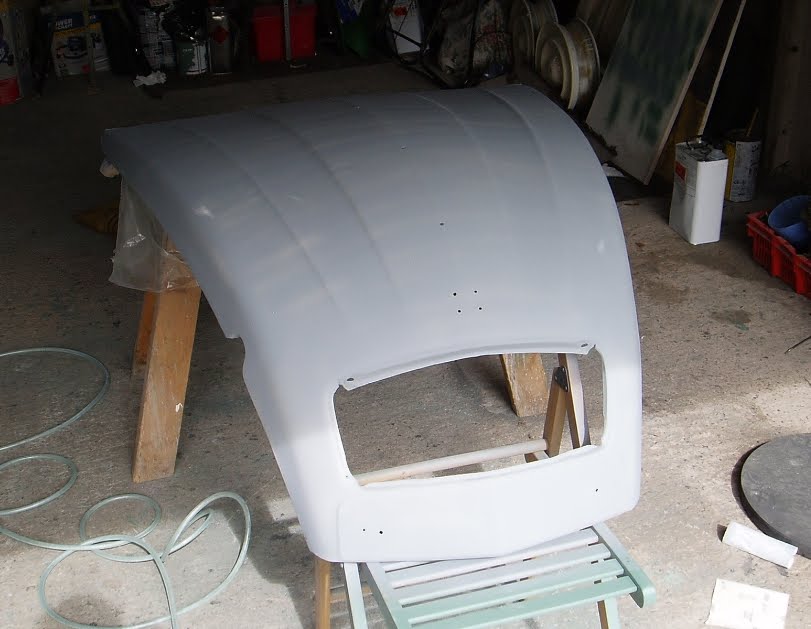 I had previously circled with marker pen any areas needing extra attention, or that had edges needing feathering out, and made sure that I got them all attended to. Next step was to lay a couple of coats of grey, high fill primer, leaving them to dry. After they were dry I dry sanded them down again to level the surface, at this point I'm still using dry sanding where others use wet simply because Cellulose primer is porous, and I don't like the idea of putting water on there for it to absorb and trap under the surface.  After the sanding is finished the panel is wiped off again before a coat of primer tinted to imitate the colour of the topcoat was put on, this too is then flatted back. At this stage the surface is beginning to look pretty smooth, which shows up any minor imperfections such as the small chip below that I had somehow missed.  There were quite a few such small imperfections so I filled them with stopper, before flatting them back level again.  There followed a final toned primer coat and a final flatting back, still done dry using a foam pad on a block.  Once this was finished and once more wiped down with panel wipe the surface looked ready for the topcoat. I'll leave that job until tomorrow though, as I like to give the paint time to fully flash off overnight, maybe it doesn't need that long, but doing it this way gives me peace of mind.  One thing I'd like to mention here that I did wrong earlier was sealing the bonnet hinge. This bonnet wasn't in the best condition around the hinge area, I was given a clue to this by the strip of electrical tape that the previous owner had used on there to cover the rust spots. I showed earlier that I had ground out the old sealer with a rotary wire brush, before treating the rust and etch priming the whole hinge area. All that was fine, but then I got my 'Mr impetuous' head on, and applied Wurth bonder/sealer all over the hinge as shown below...bad move! Wurth makes an excellent seam sealer in this product, and it's actually sandable the day after application which is great, but Why TF I didn't put a strip of masking tape to cover the lower hinge area and prevent the stuff going in there and all over I'll never know. The result was five minutes applying the stuff, thirty minutes taking it back off the following day!   Above: Gung ho sealant spreading causes much muttering later! After the bonnet was in primer the hinge area still looked a little crappy due to my previous slap dash sealer application, so I scuffed it up again, laid down two strips of masking tape (see I'm learning  ) and applied the sealant again. this will harden off overnight enough to be reprimed, then painted over with the rest of the top coat.  Much neater!
_________________
'Democracy my Arse'
|
| April 9th, 2010, 8:26 pm |
|
|
|
Erasmo
Firing on two.
Joined: January 18th, 2010, 4:35 pm
Posts: 275
|
Re: My old Blue Bamboo Looks great! Got any fingers left?
_________________
 
|
| April 9th, 2010, 11:02 pm |
|
|
|
Punky
2CV Fan
Joined: January 11th, 2010, 3:14 pm
Posts: 83
|
Re: My old Blue Bamboo I really like your work. I don't have the patience to do it like you. Congrats!!!
_________________

|
| April 10th, 2010, 1:05 am |
|
|
|
Old-Nail
Firing on two.
Joined: October 7th, 2009, 12:10 pm
Posts: 2192
Location: NWUK
|
Re: My old Blue Bamboo Erasmo wrote: Looks great! Got any fingers left? I should have mentioned this I have a tip for it. I've no idea where she got them from, but Mrs Nail had several pairs of white cloth gloves, similar to the ones that the ref wears in snooker. Had, because I nicked them, and use them for doing the sanding in. They work good on two levels, firstly they protect your fingers from the sandpaper, and secondly they protect the paint surface from the oils in your hands which would contaminate it. I've tried rubber gloves and they always split when sanding, but the cloth ones are brilliant if you can get them.
_________________
'Democracy my Arse'
|
| April 10th, 2010, 11:12 am |
|
|
Who is online |
Users browsing this forum: No registered users and 193 guests |
|
You cannot post new topics in this forum
You cannot reply to topics in this forum
You cannot edit your posts in this forum
You cannot delete your posts in this forum
You cannot post attachments in this forum
|

|