| Author |
Message |
|
bertiewhite
Firing on two.
Joined: January 18th, 2009, 3:58 pm
Posts: 682
Location: Lincolnshire

|
 Re: Belinda: on the road Back into the garage this week after my Christmas break and I'm finishing the window frames off. When I was welding the repair pieces in I wondered if it would be better to seam weld all along the frame or to just tack weld at intervals and seal the rest of it. The reasoning behind this was because I wondered if a continously welded seam would actually be waterproof which is, afer all why I'm sorting the frames in the first place.
I decided to tack weld in the end and use a substance called "PRC High Strength Fuel Tank Sealant" which unsurprisingly, is used to seam-seal aircraft fuel tanks. If it's good enough to keep fuel in fuel tanks then it'll be good enough to keep the rain out of my car is my train of thought here. I've mentioned it on the forum before but to explain - PRC is a positive joy to use. It comes as a 2 part mixture in a tube which gets mixed by breaking a membrane with a provided plunger. The plunger is then reversed, a nozzle fitted and the sealant is dispensed as you would a bath sealant. The trouble is that it takes at least 24 hrs to cure (dependant on temperature) but in my case that's good because it was easily workable for a few hours.
Anyway, whilst that stuff's curing for a couple of days I've been thinking about colour as the frames will need priming and painting before the windows go back in. I approached our paint shop earlier today to see if they ever throw life-expired paint out. The good news was that yes, they have some old Desert Biege paint that is past it's expiry date but no they're not allowed to give it to me as it all has to be accounted for. Nevermind, nice idea
_________________

|
| January 6th, 2010, 4:25 pm |

|
|
|
bertiewhite
Firing on two.
Joined: January 18th, 2009, 3:58 pm
Posts: 682
Location: Lincolnshire
|
Re: Belinda: on the road Just in case you all thought I'd been sitting on my fat arse for the last week or so, I've been getting on with primering the window frames before painting & putting the windows back in. The trouble is with the cold weather at the moment, there's only so much I can do at once, even in a heated garage. There are no pics at the moment because even I'm getting bored with looking at window frames! I've been using hammerite "anti-rust" primer that came in a pack with the Kurust I used on some of the old metal. I don't for a moment believe that "anti-rust" primer is much better than any other primer but it does brush on nicely and gives a nice flat finish. I've given the frames 2 coats inside and out so far and will give them a final coat tonight before trying out some of the military "Desert Sand Beige" that I've managed to get hold of. I had to buy some in the end but my reasons for using this kind of paint are: 1. It's matt, so should go on easier with a roller and/or brush & will suit the car better 2. It will hopefully give a better finish than gloss without having to sand back every little imperfection 3. I can paint the car in sections as & when I can instead of having to prepare the body and do it all in one go 4. It should be durable 5. Matching shades shouldn't be an issue in the future (for as long as we operate in the desert!) 6. It should provide a good base for a camouflage scheme Whilst the primer was drying I spent the rest of the evening making a start on sanding down the bodywork in preparation for painting. It was whilst I was sat there listening to the radio that I realised I love this kind of work as I find it very therapeutic. Given that most of the bodywork on the Bedouin is fibreglass/plywood I can afford to do this stage of the restoration a bit at a time whilst still using the car without the need to think about protecting bare metal from the elements and what little outside metal there is can be done in a relatively small time. As for colour scheme, I was contemplating a "Berlin Brigade" camouflage idea: http://www.hueybravo.net/images/marines/v150b.jpgbut I think it would be a bit too much so I've almost decided on this 3 colour affair: http://upload.wikimedia.org/wikipedia/commons/8/8f/Land_Rover_Series_III_Bright_Star_85_rear_q.jpgI've got a metal jerrycan that I want to paint to match so I can practice on that first.
_________________
|
| January 13th, 2010, 12:06 pm |
|
|
|
toomany2cvs
Firing on two.
Joined: December 26th, 2008, 9:40 pm
Posts: 3332
Location: Surrounded by 2cvs...
|
Re: Belinda: on the road bertiewhite wrote: before trying out some of the military "Desert Sand Beige" that I've managed to get hold of. Oi! They're my taxes, they are! Quote: As for colour scheme, I was contemplating a "Berlin Brigade" camouflage idea:  but I think it would be a bit too much so I've almost decided on this 3 colour affair:  Wouldn't this SAS colour scheme be more suited to the shedouin? 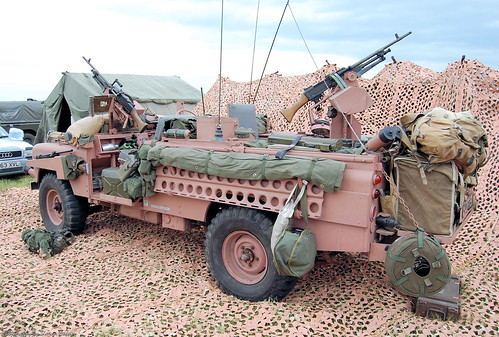
_________________

Zookeeper of a miscellany of motorised silliness - from 0.75bhp to 9ft tall - now living life on the road in an old VW.
http://WhereverTheRoadGoes.com
|
| January 13th, 2010, 12:20 pm |
 
|
|
|
Old-Nail
Firing on two.
Joined: October 7th, 2009, 12:10 pm
Posts: 2192
Location: NWUK
|
Re: Belinda: on the road bertiewhite wrote: Whilst the primer was drying I spent the rest of the evening making a start on sanding down the bodywork in preparation for painting. It was whilst I was sat there listening to the radio that I realised I love this kind of work as I find it very therapeutic. but I think it would be a bit too much so I've almost decided on this 3 colour affair: http://upload.wikimedia.org/wikipedia/commons/8/8f/Land_Rover_Series_III_Bright_Star_85_rear_q.jpgI've got a metal jerrycan that I want to paint to match so I can practice on that first. I found the same, I think the painting stage has been the most satisfying of all. Also think the scheme above looks spot on, but you'll need to spray the top colours on to get that faded edge, a roller won't dive you that.
_________________

'Democracy my Arse'
|
| January 13th, 2010, 2:36 pm |
|
|
|
bertiewhite
Firing on two.
Joined: January 18th, 2009, 3:58 pm
Posts: 682
Location: Lincolnshire
|
Re: Belinda: on the road toomany2cvs wrote:
Oi! They're my taxes, they are!
No mate, I had to pay for it in the end - much to my annoyance 
_________________
Last edited by bertiewhite on January 13th, 2010, 5:50 pm, edited 2 times in total.
|
| January 13th, 2010, 3:20 pm |
|
|
|
bertiewhite
Firing on two.
Joined: January 18th, 2009, 3:58 pm
Posts: 682
Location: Lincolnshire
|
Re: Belinda: on the road Old-Nail wrote: Also think the scheme above looks spot on, but you'll need to spray the top colours on to get that faded edge, a roller won't dive you that. It's only the base coat I'll be rollering - the rest I can do with rattle cans, although I have found a proper spray gun in our motor club so I might have a go with that.
_________________
|
| January 13th, 2010, 3:28 pm |
|
|
|
bertiewhite
Firing on two.
Joined: January 18th, 2009, 3:58 pm
Posts: 682
Location: Lincolnshire
|
Re: Belinda: on the road Well after giving the window frames another coat of primer and letting it dry last night I thought I'd see what this new paint is like. I tried brushing some onto my Jerry Can and also in the window fames & surrounds and initially I wasn't at all impressed but when dry it looks surprisingly good. Despite a multitude of brush strokes in the paint when wet, it dried lovely & flat so it should look even better when rollered and given another coat.
I checked out the paint gun that I found and that seems to work ok as well so I think I'll experiment using some spare paint on some scrap metal to practice my camo painting, although that'll be some way off yet.
_________________
|
| January 14th, 2010, 10:34 am |
|
|
|
bertiewhite
Firing on two.
Joined: January 18th, 2009, 3:58 pm
Posts: 682
Location: Lincolnshire
|
Re: Belinda: on the road I've made some real progress in the last couple of days with the nearside windows & rear quarterlights now fitted. I don't think I mentioned it before but after a lot of thinking and a little bit of experimentation, I decided the best way forward was to cut new windows from 4mm plexi-glass and bond them in with a proper window adhesive. I was going to use the same stuff that windscreens are held in with which that comes in a gun but thought that as my windows don't have the same black surrounds as modern car windows do, it had the potential to look quite messy. After a bit of digging on the internet, I came across some "Butyl adhesive strip" and an email to the manufacturers revealed that bonding windows is exactly what it's designed for. It comes in a roll 10mm wide and is like a squashed sausage and it was simply a matter of pressing it into the window frames then pressing the window into place. After applying pressure all round the window a bit at a time, it seals everything with a very neat result. I'll add photos tomorrow.
_________________
|
| January 21st, 2010, 4:15 pm |
|
|
|
bertiewhite
Firing on two.
Joined: January 18th, 2009, 3:58 pm
Posts: 682
Location: Lincolnshire
|
Re: Belinda: on the road Here are a couple of pics of the windows I put in this week: The outside. Because of the thickness of the adhesive roll, the windows sit quite flush with the body which I think is good  and this is from the inside where you can hopefully see that the adhesive forms a nice seal with the frame 
_________________
|
| January 23rd, 2010, 1:40 pm |
|
|
|
Neil
super slot
Joined: November 28th, 2008, 11:14 pm
Posts: 8797
Location: Cornwall, UK
|
Re: Belinda: on the road looking good!
_________________

|
| January 23rd, 2010, 1:54 pm |
|
|
Who is online |
Users browsing this forum: No registered users and 42 guests |
|
You cannot post new topics in this forum
You cannot reply to topics in this forum
You cannot edit your posts in this forum
You cannot delete your posts in this forum
You cannot post attachments in this forum
|
|