| Author |
Message |
|
ken
Agony Aunt - You have a car problem? Speak to Ken
Joined: March 6th, 2009, 1:40 am
Posts: 3675

|
 Re: 1955 Traction Avant 11cv Out of interest, are those triangular-shaped stiffening sections underneath the floor panels an original feature of a Traction? It's just that I've been using something very similar when building chassis for the UK 2CV racing series... 
_________________

|
| December 18th, 2014, 12:23 am |

|
|
|
Tripyrenees
Firing on two.
Joined: December 17th, 2012, 10:03 pm
Posts: 966
Location: Luscan, Pyrenees, FRANCE
|
Re: 1955 Traction Avant 11cv yep, they strenthen as well as one being used to conduit the rear brake line and feul pip.
They are open at the ends and I ammazed they do not rot out more. mine are in perfect condition nd I will waxoil them when I am done.
|
| December 18th, 2014, 12:34 am |

|
|
|
Tripyrenees
Firing on two.
Joined: December 17th, 2012, 10:03 pm
Posts: 966
Location: Luscan, Pyrenees, FRANCE
|
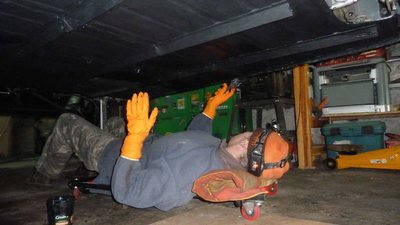
Re: 1955 Traction Avant 11cv I got the under floor finished with the help of my wife, Julie. So as the menial tasks were being taken care of I could get on with the more important engine build  Attachment:
 P1070002.jpeg [ 46.59 KiB | Viewed 3678 times ]
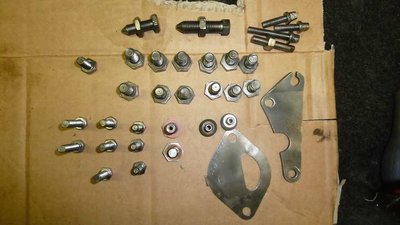
Also allowed me to have 3 coats of stone chip applied as she had plenty of time  I actually went onto clean all the nuts and bolts and try and figure out where it all came from. I did put it all in tea tins with labels but the individual pieces are taxing my brain a little. Although I did find out about one being the Time Chain lubricator - I just though it was a spare bolt Attachment:
 P1070006.jpeg [ 50.25 KiB | Viewed 3678 times ]
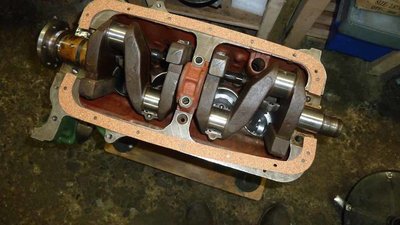
And now onto the important bit - the engine. Attachment:
 P1070007.jpg [ 53.11 KiB | Viewed 3678 times ]
|
| December 19th, 2014, 4:40 pm |
|
|
|
Tripyrenees
Firing on two.
Joined: December 17th, 2012, 10:03 pm
Posts: 966
Location: Luscan, Pyrenees, FRANCE
|
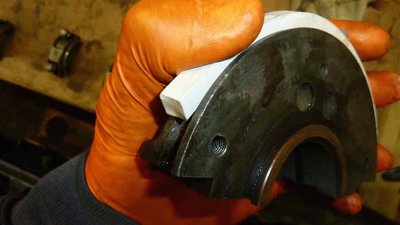
Re: 1955 Traction Avant 11cv So when I come to put in the crank seal assembly the rubber seal is a little short. Now is it supposed to be this length and I need to stretch it or is it just too short. I was going to close it together and superglue the ends to make a complete rubber ring. I have sent a message to CAS in the Netherlands to find out. Attachment:
 P1070009.jpeg [ 32.84 KiB | Viewed 3678 times ]
This is the timing chain end and this will not meat the crankcase surface at all. Attachment:
 P1070010.jpg [ 33.49 KiB | Viewed 3678 times ]
|
| December 19th, 2014, 4:49 pm |
|
|
|
Tripyrenees
Firing on two.
Joined: December 17th, 2012, 10:03 pm
Posts: 966
Location: Luscan, Pyrenees, FRANCE
|
Re: 1955 Traction Avant 11cv This is so annoying - I ordered the gasket kit thinking it would have ALL the gaskets in it. But no, there are some extras. So firstly I used the rubber seal in the wrong place (I can see that now), this is to go between the bearing cap and the sump. It will need stretching  But there is a half moon of steel that is required to secure this in place.... who knew??  Attachment:
 DSC06572.jpg [ 35.87 KiB | Viewed 3677 times ]
And for the crank seal I need a length of special cord...... aaaaargh  Attachment:
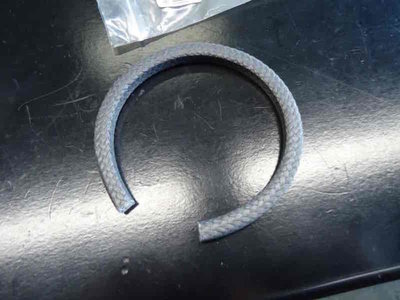 DSC06574.jpg [ 34.91 KiB | Viewed 3677 times ]
It is now in the post from Holland along with a carb gasket kit and a feul pump gasket kit and also the carb heat shield..... may as well profit from a new order of parts
|
| December 19th, 2014, 5:16 pm |
|
|
|
ChrisW
Firing on two.
Joined: February 21st, 2012, 9:01 pm
Posts: 1136
Location: Avranches, Sud Manche, France
|
Re: 1955 Traction Avant 11cv That special cord looks like wood burner stove door seal. You can buy this in Brico Marche in different sizes
|
| December 19th, 2014, 9:02 pm |
|
|
|
Tripyrenees
Firing on two.
Joined: December 17th, 2012, 10:03 pm
Posts: 966
Location: Luscan, Pyrenees, FRANCE
|
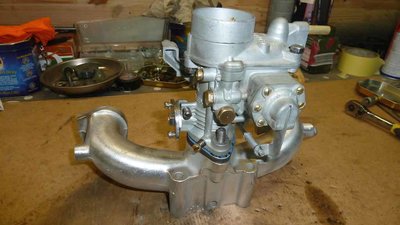
Re: 1955 Traction Avant 11cv Still waiting for some parts so I can get on with the engine but they have not arrived yet...... oh yeah, it is christmas too So on with some more cleaning. The manifolds, Carb and fuel pump. Attachment:
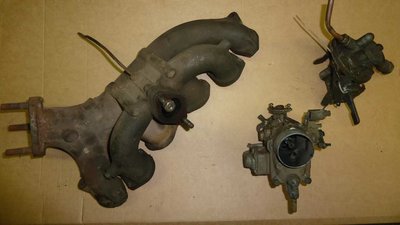 P1070011.jpg [ 39.59 KiB | Viewed 3622 times ]
The Carb I will have to strip again when the refurb kit arrives but I thought I had better put it back together before I forgot where all the pieces got to. Attachment:
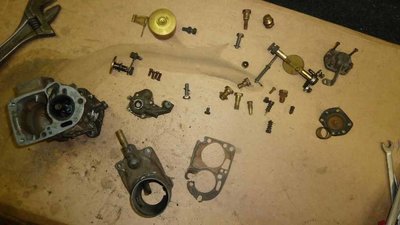 P1070045.jpeg [ 40.91 KiB | Viewed 3622 times ]
And the inlet manifold came up a treat - no paint required. Attachment:
 P1070046.jpeg [ 46.15 KiB | Viewed 3622 times ]
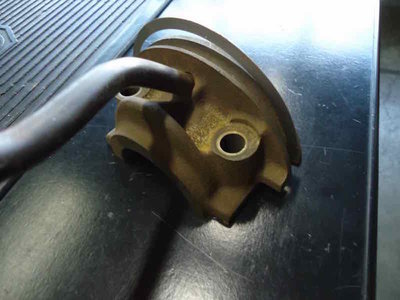
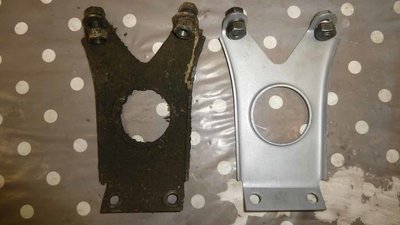
Then onto some of the miscallaneous bits and bobs. This Pyrenean mud seems to have preserved the metal pretty well. Attachment:
 P1070048.jpeg [ 36.45 KiB | Viewed 3622 times ]
|
| December 26th, 2014, 12:48 pm |
|
|
|
azuiper
2CV Fan
Joined: December 27th, 2012, 10:23 pm
Posts: 62
|
Re: 1955 Traction Avant 11cv which method did you use to create this excellent result ??
|
| December 27th, 2014, 1:18 am |
|
|
|
ken
Agony Aunt - You have a car problem? Speak to Ken
Joined: March 6th, 2009, 1:40 am
Posts: 3675
|
Re: 1955 Traction Avant 11cv azuiper wrote: which method did you use to create this excellent result ?? Pure magic... 
_________________
|
| December 27th, 2014, 2:42 am |
|
|
|
Tripyrenees
Firing on two.
Joined: December 17th, 2012, 10:03 pm
Posts: 966
Location: Luscan, Pyrenees, FRANCE
|
Re: 1955 Traction Avant 11cv I stripped the carb all down first. Then some time in the microsablage cabinet (fine sand blaster). This is not good on greasy things so a full degrease first and rub down, scraping any lumps out of the groves and corners first. Also my cabinet is getting damp now its winter so the sand is clogging up the pistol..... pain  Then, in the case of the manifold I polished it up on the wire wheel which takes away the dull finish the sand blasting gives. For the carb I flushed it all out with degreaser and fuel to get any grains out. Then blew it through with some compressed air. The individual brass fittings I wire wheeled, but it was not necessary as the carb refurb kit had come with absolutely every part - last kit I got had a gasket and a main jet replacement. This one from CAS came with every new removable piece including the brass float for €20. Will post of the photos when I rebuild it again.
|
| December 27th, 2014, 11:37 am |
|
|