| Author |
Message |
|
Pony
Firing on two.
Joined: January 16th, 2010, 5:15 pm
Posts: 212

|
 Re: 1955 Traction Avant 11cv most tanks are do able
i would go for 1.5 mm thick min
and over lap joints if possible
and pressure test with about 0.3 bar using washing up liquid on the outside to check for leaks.
i have built a few tanks over the years also with no problems
i would not repair
Pony
_________________

|
| November 3rd, 2014, 10:58 pm |

|
 |
|
Tripyrenees
Firing on two.
Joined: December 17th, 2012, 10:03 pm
Posts: 966
Location: Luscan, Pyrenees, FRANCE

|
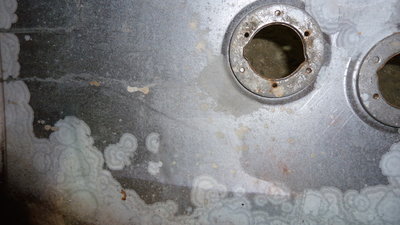
 Re: 1955 Traction Avant 11cv I have cut out the rusty area which is the sump part (slight bowl in the bottom of the tank with a drain plug) The tank looks good inside, zero rust other than slight surface around where I have cut. Any ideas on how to form a new sump and how would I put a drain plug back in - OR is any of that necessary, could I just weld a flat patch over the hole. The tank is easy to get to and to remove if ever I needed to work on it. Attachment:
 P1060819.jpeg [ 52.45 KiB | Viewed 3544 times ]
Attachment:
 P1060818.jpeg [ 284.36 KiB | Viewed 3544 times ]
|
| November 4th, 2014, 3:45 pm |
 
|
 |
|
subarupete
Firing on two.
Joined: March 5th, 2009, 6:23 pm
Posts: 2251
Location: Near Monmouth

|
 Re: 1955 Traction Avant 11cv Weld your patch larger than the hole, there will be small sump. Else get a leather bag+silver sand and hammer the steel to a sump shape ebay uk but an idea http://www.ebay.co.uk/itm/Leather-Sandb ... 2c8f9dd873
|
| November 4th, 2014, 4:32 pm |

|
 |
|
AZL57
Firing on two.
Joined: October 22nd, 2014, 10:59 pm
Posts: 2252
Location: South-Limburg

|
 Re: 1955 Traction Avant 11cv it's easy to form a plate like that.
|
| November 4th, 2014, 6:03 pm |

|
 |
|
Tripyrenees
Firing on two.
Joined: December 17th, 2012, 10:03 pm
Posts: 966
Location: Luscan, Pyrenees, FRANCE

|
 Re: 1955 Traction Avant 11cv AZL57 wrote: it's easy to form a plate like that. Heart surgery is easy if you are a surgeon  Take me through it step by step  Do these bulkhead drain plugs exist anywhere, can they just be fitted by screwing them through the hole (like a plumbing fitment)
|
| November 4th, 2014, 7:39 pm |
 
|
 |
|
subarupete
Firing on two.
Joined: March 5th, 2009, 6:23 pm
Posts: 2251
Location: Near Monmouth

|
 Re: 1955 Traction Avant 11cv Give it a try... ps Since retiring i have learnt to Mig weld and use a Lathe after a career in IT.. 
|
| November 4th, 2014, 8:27 pm |

|
 |
|
Tripyrenees
Firing on two.
Joined: December 17th, 2012, 10:03 pm
Posts: 966
Location: Luscan, Pyrenees, FRANCE

|
 Re: 1955 Traction Avant 11cv I always try - just nice to see some examples.
I will look out for a rounded item to bash some metal over tomorrow.
Thanks for the help everyone.
|
| November 4th, 2014, 10:29 pm |
 
|
 |
|
subarupete
Firing on two.
Joined: March 5th, 2009, 6:23 pm
Posts: 2251
Location: Near Monmouth

|
 Re: 1955 Traction Avant 11cv
|
| November 4th, 2014, 10:46 pm |

|
 |
|
AZL57
Firing on two.
Joined: October 22nd, 2014, 10:59 pm
Posts: 2252
Location: South-Limburg

|
 Re: 1955 Traction Avant 11cv Find a hollow item that is easier to form. A piece of wood with this form chisseled out works nice.
|
| November 4th, 2014, 11:45 pm |

|
 |
|
Tripyrenees
Firing on two.
Joined: December 17th, 2012, 10:03 pm
Posts: 966
Location: Luscan, Pyrenees, FRANCE

|
 Re: 1955 Traction Avant 11cv I received some more info on the bottom ball joint. Originally Citroen put in a 0.05mm shim between the upper bearing race and the middle spacer. This was to allow adjustment later on when the ball joint wore a little and the shim could be removed. Both of mine still had the shim installed. But even with that removed there is not enough adjustment. So I was advised to remove the middle spacer which acts as a conduit for the greasing and discard it. (new ball joints do not come with the inner ring spacer). I first tried to smooth off the ball and the bearing race a little more using valve cutting paste and sticking the ball in the drill. It seems to have worked a treat. Attachment:
 P1060823.jpeg [ 73.56 KiB | Viewed 3451 times ]
I then installed it without the middle ring spacer and voila - I have a much better fitting lower ball joint. But to make it better and easier to adjust (instead of inserting different size shims) I have ordered an after market adjuster cap to replace the existing ones. Attachment:
 426198A-500x500_0.jpg [ 35.37 KiB | Viewed 3451 times ]
This should do the trick and even without it now it is nice and smooth with very little play now I have squirted the grease in there.  
|
| November 8th, 2014, 8:42 pm |
 
|
|

